How to Build a Garage Workbench for Your DIY Projects?
Building a garage workbench is an essential step for any DIY enthusiast. Expert Jack Johnson, a seasoned woodworker, once said, “A well-made workbench transforms your garage into a workshop.” This statement highlights the significance of a sturdy workbench and its impact on creativity and efficiency.
When crafting a garage workbench, consider your space and needs. It's not just about aesthetics; functionality is key. Dimensions should suit your projects, whether you’re assembling furniture or repairing tools. Proper storage solutions can also enhance workflow. However, many overlook the importance of materials. Using cheap wood may save money but can lead to disappointment over time.
A garage workbench should adapt to your projects. Reflect on what has worked in the past and what hasn’t. Mistakes can teach invaluable lessons. The ideal workbench balances durability with adaptability. Each homemade creation should invite improvement and reflection, making it uniquely yours.
Choosing the Right Location for Your Garage Workbench
Choosing the right location for your garage workbench is crucial for optimal efficiency. According to a report by the National Association of Manufacturers, effective workspace design can boost productivity by up to 20%. Consider positioning your workbench near existing electrical outlets. This allows easy access to power tools without long extension cords. Adequate lighting is also essential. A well-lit workspace can reduce mistakes and eye strain.
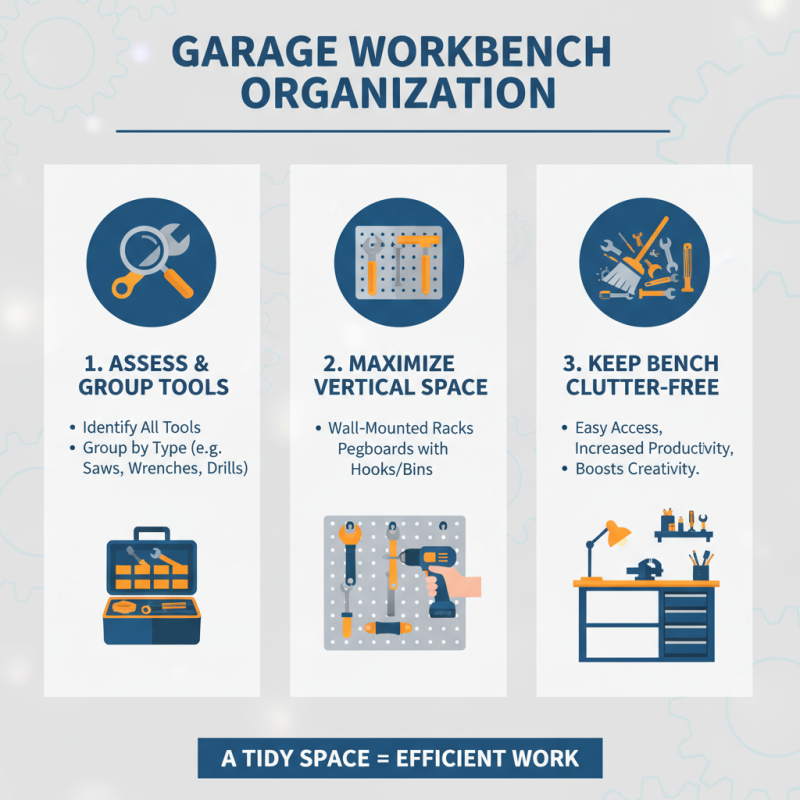
Think about your workflow. Place the workbench close to your garage door for easy in-and-out access. This can save time when transporting materials. However, avoid a spot that is too exposed to the elements. Moisture can damage your tools and materials. Remember, clutter can disrupt your focus. Allocate an area for storage bins nearby, keeping your workspace organized.
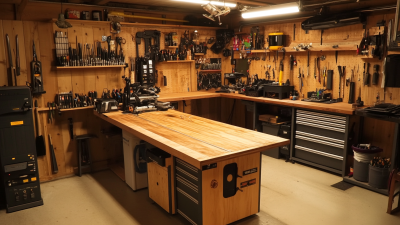
Lastly, assess the space available. If your garage is small, flexibility is key. A foldable or movable workbench can fit this need. The average garage workspace is often under 200 square feet, presenting challenges. Sometimes, working in cramped quarters forces creativity. Analyze your options and pick a location that suits your needs, allowing room for adjustments.
Selecting Suitable Materials for Your Workbench Construction
Selecting suitable materials for your workbench construction is crucial. The right choices can enhance
durability and functionality. According to a report by the
Home Improvement Research Institute, 73% of DIYers prioritize sturdy materials when building
their workspaces.
Plywood and MDF
are popular options. Plywood offers strength and resistance to warping. It comes in various grades, like cabinet
grade and structural grade. Each has its unique properties, making them suitable for different tasks. On the other
hand, MDF provides a smooth surface ideal for precision work. However,
its weight and susceptibility to moisture can be challenging.
Metal components are also worth considering. Steel frames can
support heavy items. A study by the National Association of Home Builders suggests that metal
workbenches can hold over 1,000 pounds when constructed properly. This strength contrasts with
wooden frames, which may sag over time. Choosing the right mix
of wood and metal can maximize your bench's potential.
Essential Tools and Equipment Needed for Building a Workbench
Building a garage workbench can enhance your DIY projects significantly. To start, gathering the essential tools is crucial. A power drill stands at the top of the list. According to a survey by the DIY Industry Association, over 75% of DIY enthusiasts cite power drills as indispensable. This tool aids in making precise holes and securing fasteners effortlessly.
Next, clamps are often overlooked yet vital. They hold materials steady during cuts or assembly. A study by Tooling and Manufacturing Association indicated that projects requiring clamps take 30% less time than those that don’t. A sturdy circular saw is also important. It offers versatility in cutting various materials, from wood to plywood.
When assembling your workbench, don't forget quality screws and fasteners. They provide the foundation for strength. A weak assembly can lead to wobbling, affecting accuracy. It's essential to reflect on your choices. Perhaps you skimped on size, or you misjudged the work surface height for your needs. These details matter. Choosing the right height can significantly improve comfort during long projects. Embrace the process, learn from the construction, and adjust as necessary.
Step-by-step Instructions for Assembling Your Garage Workbench
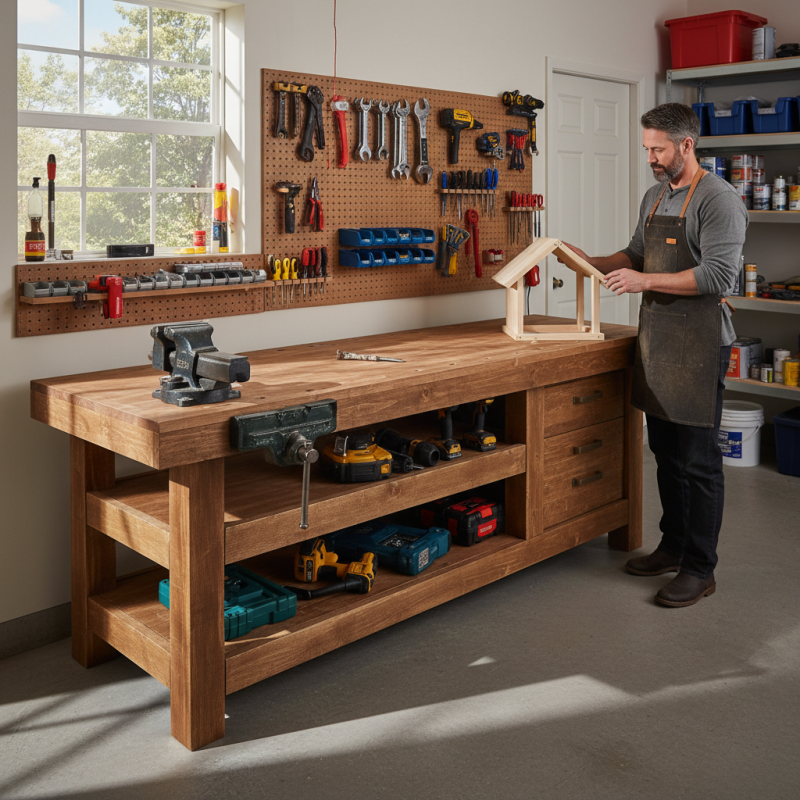
Building a garage workbench can be an exciting DIY project. Before you start, gather your tools and materials. The average garage workbench is about 60 inches long and 30 to 40 inches high. Be mindful of your workspace; it should comfortably allow for movement while you work.
Start by constructing the frame using 2x4 lumber. Cut the pieces to your desired dimensions. Secure them together using wood screws. Ensure the frame is level. Many builders overlook this step, leading to a wobbly workbench. According to a study by the National Institute of Standards and Technology, uneven surfaces can lead to errors in projects, making it crucial to achieve stability.
Next, add the tabletop. A thick plywood sheet works well. Aim for at least 3/4 inch thickness. Sand the edges to avoid splinters. After that, consider adding a protective finish. This will increase the durability of your work surface. Don’t forget to install shelves or hooks to enhance storage. A survey by the Home Improvement Research Institute indicates that 72% of DIY enthusiasts believe organization boosts productivity. Reflecting on your space and workflow can result in better project outcomes and satisfaction.
DIY Projects Completed with a Garage Workbench